Are you interested in having a rope wall at home?
This post is meant to be a basic overview to give you confidence in setting up your own ropes.
There is no right or wrong way to set up your rope wall. There are many options available. Selecting the right rope wall will depend on where you are putting it, and what your budget is.
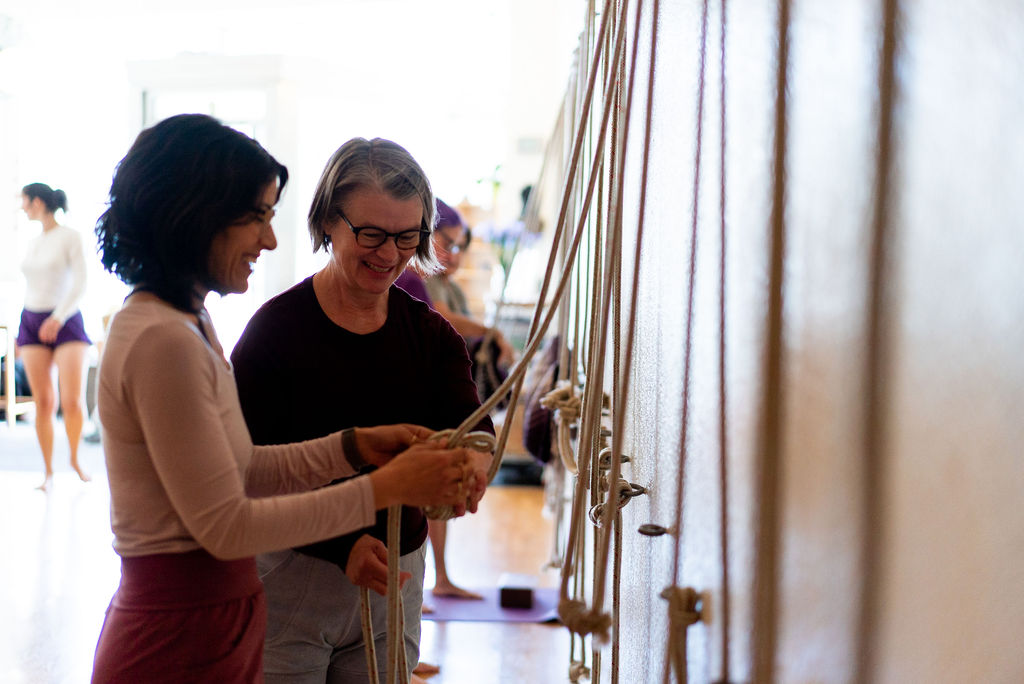
Our favorite rope wall is the kind we have at our yoga studio, the one pictured here. It has simple eye screws that we drilled into studs.
Here are the specifications for the rope wall at Adeline Yoga:
Upper hooks are attached 82 inches from the floor. We put 46-inch long 11-mm ropes there. The hip height ropes are 12-mm in width and 35 inches long. These attachment points are placed 42 inches from the floor. These 12-mm lower ropes are designed to be especially comfortable in adho mukha svanasana.
It uses 2″ eye screws attached to the wall by drilling into wall studs found in the walls. The screw needs to be fixed into the very center of the stud without splitting the wood. That takes time to do with a stud finder. We had a professional do it for the studio, but you could do it yourself for one station at home.
What to consider at your own home:
The basic idea of wall ropes is simple. You start with two high and two hip-height attachment points with sturdy marine-type ropes on each. One station of ropes is 4 ropes and 4 attachment points: two that are high, and two that are hip height. Some people also like to add two additional points that hover over the floor.
You can buy the 2″ eye screws at most hardware stores, places like Home Depot and Amazon. Our favorite is the simple and inexpensive eye screw like the one in the photo above. We find it quite elegant.
For home use, we also like a wider screw that features a rectangular shaped eye. These are nice because you can hold onto them in certain poses, and its easier to slip the ropes in and out. You can certainly find your own wide eye screws at local hardware stores and online sources. This option of the wider hooks from Yoga Kuti work well.
Whether you do an eye screw with a circle or with a long rectangle is a personal choice. What matters is that your ropes fit through the eye of the screw. Test yours before you put them into the wall.
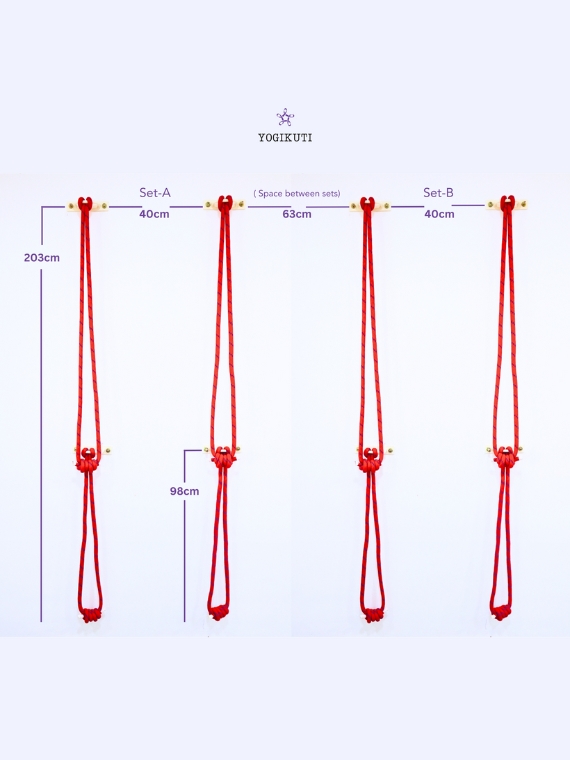
The height of the attachment points varies. It isn’t prescriptive: there are many rope lengths you could have and many different opinions for where is the best place to put the hooks. Tip: There is no “best place” for your eye screws. We have put two options here. Above are the placement for our studio ropes, and below are suggested placement for the Yogi Kuti ropes. Put the long ropes on the top, and the shorter ropes on the hooks that are at hip height.
We sell mostly ropes made by Yogi Kuti. Depicted in this photo are suggestions of where to place the eye screws for their ropes. Use these guidelines if you buy their ropes from us.
Safety Tip:
If you have worries about the sturdiness of your wall, consider adding additional security by fixing a 2×4 plank into your wall, and drilling your attachments into that.
If you do not have studs, you may need to consult a professional about what to do. Some people that have homes with lath and plaster have attached a large piece of varnished plywood to the wall before beginning with their attachments. Students have reported that brings good results.
Remember that you will be hanging your body from these ropes, so you want your set up to be safe and secure.
Other options for a rope wall:
Certainly, there are fancy options on the market today. This type of rope wall looks and works great. It has recessed hand holds and a knowledgeable person can make it from common materials.
Or, check out the Kittery Stall Bar. It ill cost $335 plus shipping. The Kittery Stall Bar isn’t traditional in Iyengar Yoga, but its straightforward to put up and take down and also very versatile both for ropes and your body. In Pune they use a “grill” on the windows for hooking your hands and feet. You can use the stall bar in that way too.
There is a Great Wall system. We are not fans of it simply because it doesn’t allow us to use the ropes we like.
Where to get the ropes?
If you are local to Berkeley, you may be able to get them from us here. We currently have complete sets of ropes from Yoga Kuti in either blue or red. Drop by the studio to pick yours up. Hardware isn’t included, but if we have some in stock we are happy to give them to you at no additional cost.
If you want to purchase your ropes online, Tools for Yoga has these. Take a tour around Etsy and you will also find options.
Certainly, you can make your own ropes. There are YouTube videos which show how to tie the ropes in the triple fisherman’s knot classically used for the rope wall. This video could be a good start.